ERC20 tokens are the foundation of blockchain economies, powering DeFi protocols, DAOs, reward systems, and more. Before ERC20, every token was different, making it difficult for wallets and applications to integrate them. The ERC20 standard solved this by creating a common set of rules that all tokens follow, bringing consistency and interoperability to token development.
This is Part 1 of a two-part technical guide where you’ll deploy your own custom token on W Chain Testnet using Remix IDE and OpenZeppelin’s battle-tested smart contract library. By the end of this tutorial, you’ll have a fully functional ERC20 token deployed on W Chain and visible in your MetaMask wallet.
What You Will Do
- Understand the ERC20 token standard and its required functions.
- Create an ERC20 token using OpenZeppelin’s secure implementation.
- Deploy your custom token to W Chain Testnet.
- Verify your token deployment on W Chain Explorer.
- Import your token to MetaMask and see your balance.
What You Will Need
Chrome, Firefox, or Brave browser.
- MetaMask browser extension with W Chain Testnet configured.
- WCO test tokens in your wallet (request from W Chain Telegram #developer topic).
- Basic understanding of smart contracts and Solidity.
Note: If you haven’t set up MetaMask with W Chain Testnet yet, please complete our first tutorial before proceeding.
Steps to follow:
Step 1: Understanding the ERC20 Token Standard
Before we create our token, let’s understand what makes a token “ERC20 compliant.”
What is ERC20?
ERC stands for “Ethereum Request for Comment,” and 20 is the proposal identifier number. ERC20 is a technical standard that defines a common set of rules for tokens on blockchain networks. Think of it as an interface in programming, if your token implements these required functions, it’s ERC20 compliant.
Why Does ERC20 Matter?
Before ERC20, every token had different functions and structures. Wallets and exchanges had to understand each token’s unique code to support it. ERC20 standardized this, making tokens instantly compatible with all ERC20-supporting wallets, exchanges, and dApps.
The 6 Mandatory Functions:
Every ERC20 token must implement these functions:
- totalSupply() – Returns the total token supply.
- balanceOf(address) – Returns the token balance of a specific address.
- transfer(address, amount) – Transfers tokens from caller to another address.
- transferFrom(address, address, amount) – Transfers tokens on behalf of the owner (requires approval).
- approve(address, amount) – Approves another address to spend tokens on your behalf.
- allowance(address, address) – Returns the remaining tokens approved for spending.
The 3 Optional (But Recommended) Functions:
- name() – Returns the token name (e.g., “W Chain Token”).
- symbol() – Returns the token symbol (e.g., “WCT”).
- decimals() – Returns the number of decimals (typically 18, like Ethereum).
Events:
ERC20 also requires two events:
- Transfer – Emitted when tokens are transferred.
- Approval – Emitted when spending approval is granted.
If you’re familiar with object-oriented programming, you can compare ERC20 to an interface. If you want your token to be an ERC20 token, you must implement all these required functions.
Step 2: Open Remix IDE and Create Token Contract
We’ll use OpenZeppelin’s battle-tested ERC20 implementation, which provides all the standard functions securely and efficiently.
- Go to remix.ethereum.org.
- In the file explorer, right-click the “contracts” folder.
- Create a new file: WChainToken.sol.
Step 3: Write Your Token Contract
Paste the following code into WChainToken.sol:
// SPDX-License-Identifier: MIT
pragma solidity ^0.8.19;
import {ERC20} from “@openzeppelin/contracts/token/ERC20/ERC20.sol”;
contract WChainToken is ERC20 {
constructor() ERC20(“W Chain Token”, “WCT”) {
_mint(msg.sender, 1000000 * (10 ** uint256(decimals())));
}
}
Understanding the Code:
- Line 1: The SPDX license identifier specifies the license for the code.
- Line 2: Specifies the Solidity compiler version (^0.8.19 means 0.8.19 or higher).
- Line 4: Imports OpenZeppelin’s ERC20 implementation—this gives us all 6 mandatory ERC20 functions automatically!
- Line 6: Our contract WChainToken inherits from ERC20, meaning it gets all ERC20 functionality.
- Line 7: The constructor runs once when the contract is deployed. It sets the token name (“W Chain Token”) and symbol (“WCT”).
- Line 8: The _mint function creates the initial token supply (1,000,000 tokens) and assigns them to the deployer’s address. The amount is automatically adjusted for 18 decimals.
How Does This Work?
By inheriting from OpenZeppelin’s ERC20 contract, our WChainToken automatically includes:
- All 6 mandatory ERC20 functions (totalSupply, balanceOf, transfer, transferFrom, approve, allowance)
- The 3 optional functions (name, symbol, decimals)
- Both required events (Transfer, Approval)
- Security features and gas optimizations
You don’t need to write any of these functions yourself. OpenZeppelin has already implemented them following industry best practices!
Customizing Your Token:
You can easily customize your token by changing the values in the constructor:
- Token name: Change “W Chain Token” to your desired name
- Token symbol: Change “WCT” to your desired symbol (typically 3-4 characters)
- Initial supply: Change 1000000 to your desired supply
For example:
constructor() ERC20(“My Awesome Token”, “MAT”) {
_mint(msg.sender, 5000000 * (10 ** uint256(decimals())));
}
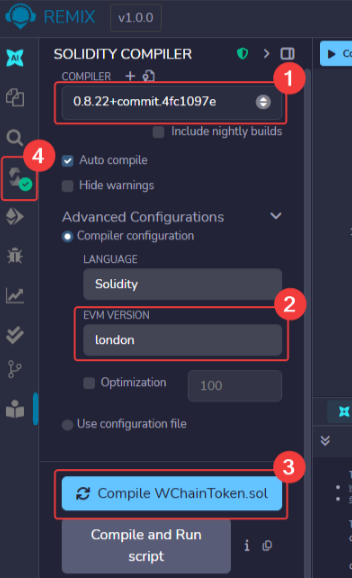
Step 4: Compile Your Token Contract
- Click the “Solidity Compiler” tab (left sidebar).
- Set the compiler version to 0.8.22 or higher from the dropdown.
- In Advanced Configurations, set EVM Version to London.
- Click “Compile WChainToken.sol”.
- Look for the green checkmark confirming successful compilation.
Note: When you first compile, Remix will automatically download the OpenZeppelin contracts from the internet. This may take a few seconds. You’ll see a progress indicator in Remix.
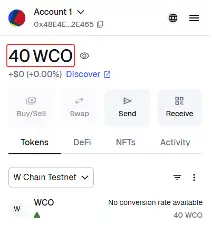
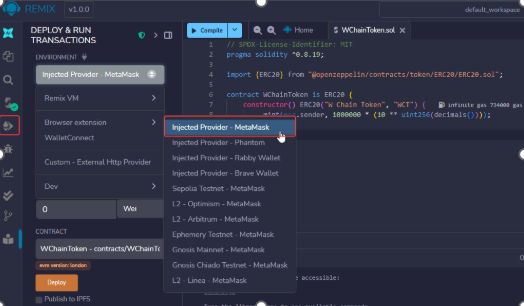
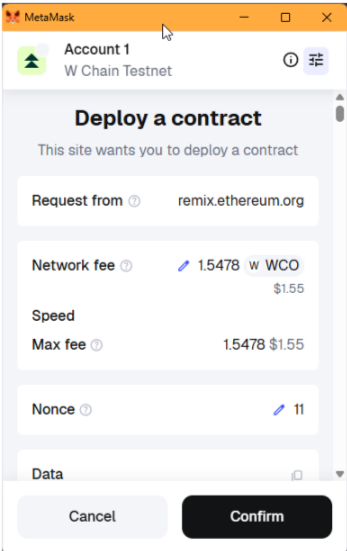
Step 5: Deploy Your Token to W Chain Testnet
1. Click “Deploy & Run Transactions” tab.
2. Select “Injected Provider – MetaMask” as environment.
3. MetaMask will pop up, click “Connect” and select your account.
4. Ensure MetaMask shows “W Chain Testnet” at the top.
5. Under “Contract,” select “WChainToken”.
6. Click “Deploy”.
7. Confirm the transaction in MetaMask.
8. Wait for deployment confirmation (usually 10-30 seconds).
Note: This contract will automatically mint 1,000,000 tokens to your address when deployed. The tokens are adjusted for 18 decimals automatically.
Success! You’ll see a green checkmark in the Remix console and your contract will appear in the “Deployed Contracts” section.
Step 6: Verify Your Token on W Chain Explorer
1. Copy your contract address from Remix’s “Deployed Contracts” section.
2. Visit W Chain Testnet Explorer.
3. Paste your contract address in the search bar.
Understanding the Explorer Tabs:
You’ll see two tabs: – Tokens (ERC-20) – Shows your token as an asset (W Chain Token, WCT). This is what users see in wallets. – Addresses – Shows the smart contract code. Click here to view transaction history and contract details.
Quick Tip: The contract address is what you share with others to add your token to their wallets.
4. Click the Addresses tab to see your contract and deployment transaction.
Step 7: Import Your Token to MetaMask
Let’s add your token to MetaMask so you can see your balance!
- Copy your deployed contract address from Remix.
2. Open MetaMask and ensure you’re on W Chain Testnet.
3. Click on “Tokens” tab.
4. Click “Import tokens”.
5. Paste your contract address in the “Token contract address” field.
6. MetaMask will automatically fetch the Token Symbol (WCT) and Decimals (18).
7. Click “Next” and then “Import”.
Congratulations! Your token should now appear in MetaMask under the Assets section, showing your 1,000,000 WCT balance!
6. Additional Resources
- W Chain Documentation – Complete developer guides and API references.
- W Chain Telegram Community – Get support and connect with other developers.
- Remix IDE – Browser-based Solidity development environment.
- OpenZeppelin Contracts – Secure smart contract library.
- ERC20 Token Standard – Official ERC20 specification.
- W Chain Testnet Explorer – View transactions and contracts.
Final Thoughts
Congratulations! You’ve successfully created and deployed your own ERC20 token on W Chain. Your token is now live on the blockchain, verified on the explorer, and visible in your MetaMask wallet. You’ve taken a major step into blockchain development!
What You’ve Accomplished:
- ✅ Created a fully ERC20-compliant token using OpenZeppelin.
- ✅ Deployed your token to W Chain Testnet.
- ✅ Verified your deployment on the blockchain explorer.
- ✅ Imported your token to MetaMask and confirmed your balance.


